TL;DR: Plastic parts are looking good; Wooden parts are looking good; Raw material costs in China are skyrocketing; Open source is amazing.
Hello from Oakland!
This is part two of our March 2017 update. If you missed part one last week, you can read it on Kickstarter.
Baseplates
One of the ongoing problems we’ve had with our manufacturer is the quality of the plastic baseplates being produced for us.
First, here’s a recap of the saga of the baseplates up to now.
When we started this process, we’d specified metal baseplates. We’d also specified press-fit nuts and standoffs for anchoring the keyplates and wooden enclosures to the baseplate.
The factory proposed swapping out the metal for plastic. While we were a little bit nervous about this, plastic has the dual advantages of weighing less and better fitting our design. With the plastic baseplates, the factory was able to mold in features to help protect the RJ45 and Type C jacks. They were able to mold the metal tripod mounts right into the plastic.
And back when we thought there were going to be flip-out feet on the bottom of the keyboard, they were going to be able to hide the feet inside baseplates.
Well, it turned out that the flip-out feet just weren’t going to work. The factory took a gamble and had their partner start on the baseplate injection molding tooling before we signed off on this part of the design.
The first versions of the baseplates came back with numerous “hot points” where you could see sinking due to the plastic cooling at a different rate. That’s not great, but is entirely normal for a first (called a “T0”) injection sample.
Entirely aside from the issue with the feet, the quality of the baseplates provided by the factory’s partner was not up to snuff. There were many issues, both small and large. The biggest issues centered around the quality of the tooling. The internal “ribbing” on the parts looked like they’d been hand-cut by a CNC operator. The lines were too thin and not quite in the right place. There were places that two of the ribs were supposed to touch, but instead they were about a millimeter apart. Because the structural stability of the part depends on those ribs being fused together, this was less than ideal.
We asked them to try again.
The injection factory blew their self-imposed deadline by a week or two. The parts they came back with looked a little better, but as we looked at the details, we found that the structural lines hadn’t really been made thicker. They’d just cut new lines next to them which… almost lined up.
This is right about when the factory read them the riot act. They told the injection supplier they had one more chance to fix things.
The injection factory blew their self-imposed deadline by a week or two. The next version was a little better, but still just didn’t match the design files sent to them in a number of places. What’s worse was that the injection factory thought they’d done a decent job.
By now, it was early January and we were at T5 or T6. We were pretty frustrated.
The factory relented and asked the injection molding factory to take one more shot at things.
The injection factory blew their self-imposed deadline by a week or two. The samples they came out with were ok, but still not production quality.
This was the point at which our factory started shopping for a new injection molding partner in earnest. Just before Chinese New Year, the factory told us which of the three bids for the baseplates they thought we should accept. The only real details we had were the pricing and the factory’s opinion, so we ran with it.
They told us that the new factory expected to finish tooling the week of March 5, with samples sometime that week.
Once Jesse got to China, the factory took Jesse to visit the new baseplate supplier. They confirmed that tooling and “T0” injection samples would be ready on March 8.
The tooling supplier showed us the work-in-progress injection molds, as well as their fancy test equipment.
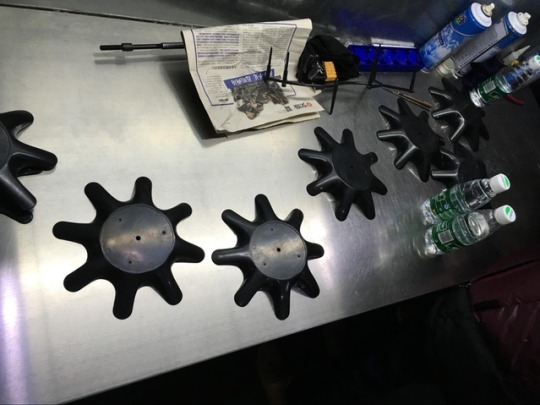
Well, March 8 rolled around and the injection factory asked if we could delay our visit until the afternoon. With a little bit of trepidation, we agreed. When we showed up sometime after lunch, we were brought straight to one of their injection machines. The factory manager, in a suit, was pulling out baseplates, “hot off the presses.”
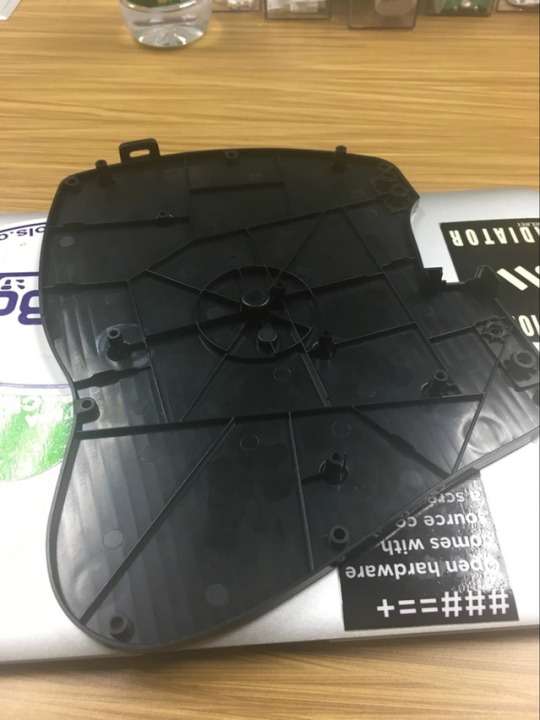
The first “T0” sample of the left baseplate from the new supplier
We took them upstairs to the injection shop’s offices, pulled out our sharpies and started marking up issues as we found them. There were a reasonable number of “hot point” sinkholes, but that’s very much part for the course as molds get dialed in.
The first samples didn’t have tripod mounts on the bottom. To add them, it was just a matter of adding tripod mount inserts into the tool as it made each sample. We then found that the tripod screw inserts, while exactly as long as we’d specified, were missing a bit of headroom above them. The problem with this is that longer tripod screws wouldn’t be able to screw all the way into the baseplates, leaving them extra wobbly. We’d picked a depth of 6mm because that’s what the ISO standard for camera tripod mounts says. Perhaps unsurprisingly, some of our test commercially available camera tripods actually have screws as long as 7 or 8mm. After talking things through with the injection supplier, we decided to switch to 10mm long threaded inserts. There was a little bit of stress because the injection factory’s supplier claimed they couldn’t actually do 10mm inserts while still making them from stainless steel. We’d have to switch to brass or galvanized iron. This seemed a little bit nutty to us. We agreed that brass was the better of the two choices. (While it might deform a little bit, it’s unlikely to start rusting after repeated use wears it down.) The next day, with help from our friends at HWTrek, we got the injection factory to recant and switch back to stainless steel. We’re still not quite sure what happened, but we’re happy with the result.
Back to the baseplate inspection. These samples looked good. Surprisingly good. The baseplate supplier agreed to run the samples through their fancy 3D measurement machine to compare them to the CAD designs. We handed them our marked-up samples showing off the issues we’d found.
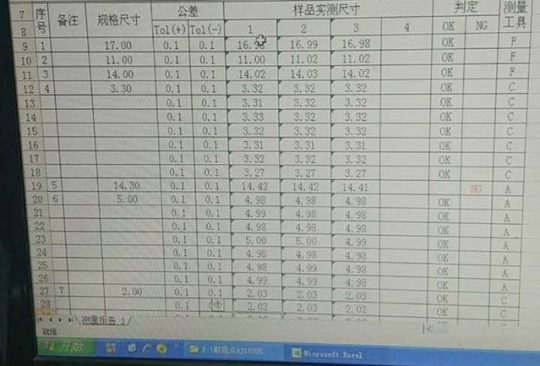
A report showing how well the first version of the new baseplates matched the CAD designs
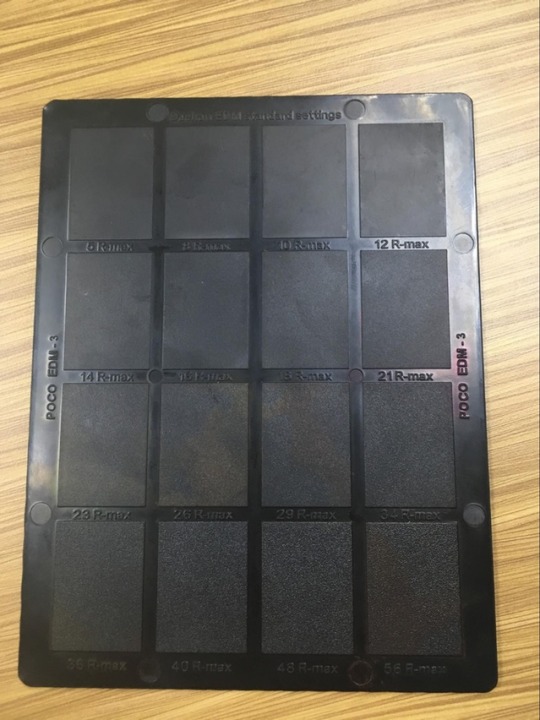
At that point, it was again time to talk about texture. The injection factory pulled out their texture sample card. We settled on texture number 48, which is a moderately dense texture we found both attractive and a little bit “grippy.”
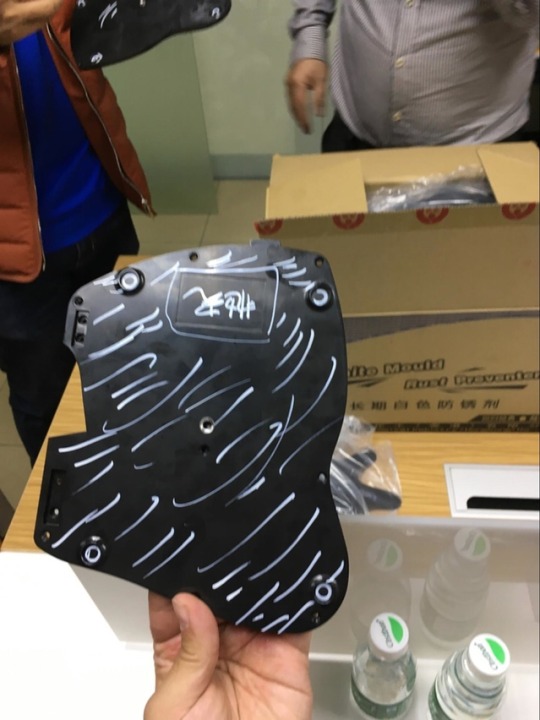
After that, the factory’s R&D manager marked up samples with a white paint pen to show the surfaces that should have the texture applied. The injection molding factory said they expected to be able to turn new samples fixing the substantive issues by the time Jesse left China four days later. They warned that we shouldn’t expect the texture to be applied yet.
Lo and behold, four hours before Jesse left China, a team from the factory met him at his hotel with a fully assembled sample keyboard. Including new textured samples of the baseplates. We’re very happy with the new samples, though the factory found a few small things that needed touching up. The baseplate supplier is making those changes now.
The stands
We didn’t know this until we turned up at the factory, but the supplier that the factory selected for the baseplates is also the supplier making the stands.
The story for the stands is much the same as the story for the baseplates, starting from the injection mold factory’s promise date of March 8. Shortly after the sample baseplates came popping out of the injection molding machine, sets of stands started to accumulate on a work table.
We went through the same process as with the baseplates, looking for hot points and other molding issues.
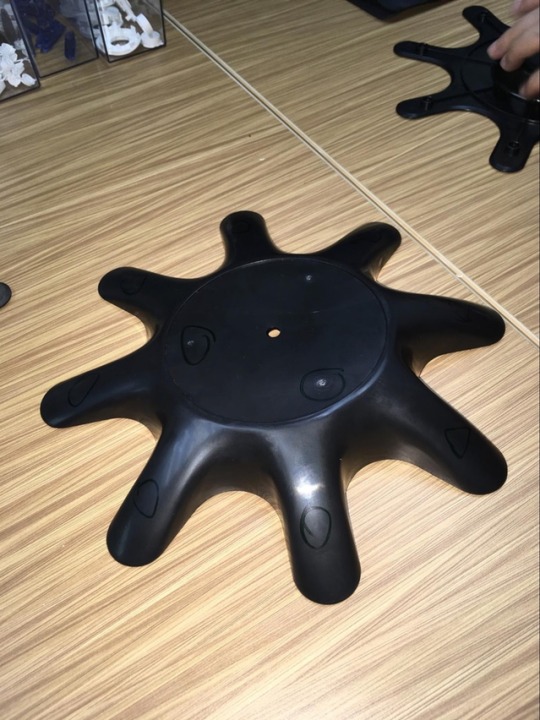
If you look carefully, you can see some small issues with the stand circled in green marker
One thing that came up was that the screw bosses on the top halves of the stands were inconsistent sizes. We figured this out as we tried to assemble a stand. One or two screws fit well, but most of them just spun in place, never finding any plastic to bite into.
Another problem was that in the top half of the stands, a bit of the support structure seemed to be a mite short. This resulted in the part feeling slightly less sturdy.
The molding factory promised to run the stands through their measuring system, too.
We marked up a sample stand, showing which parts should be textured and which parts should be left flat so the adhesive for the feet and top piece would get a better grip.
Four days later, the factory presented us with a pair of stands with just about every issue corrected.
One item we’ve found since is that the screw hole in the stands is…not quite a circle. Our best guess is that the mechanical engineer modeled the hole as a cylinder, but started from the wrong “ground plane.” In testing, this issue doesn’t affect the keyboard’s usability or stability at all (nor is it visible when the keyboard is on the stands), but it makes us a little bit sad to have missed when it was still an easy fix.
Screws for the stand
The tripod screws we’re using for the stand have been working pretty well, but the factory thinks they can be improved.
Apparently, the way all-metal screws like this are made is that they’re CNCed. Because of this, the cost difference between a “standard” screw and a custom screw is minimal. They tell us that the lead-time for this new screw is similar to the lead time for the “standard” design, too.
The factory had a sample of a custom screw made and is sending it along to us for our review and (possibly) our blessing.
Center bars and rails
The center bars and rails are the bits that keep the two halves of the Model 01 connected in a flat or tented configuration. You don’t have to use them, but many of us want our keyboards to be one-piece units most of the time.
The design of the center bars and rails has been fixed for months, but the factory has been working through fit and warping issues.
These parts are going to get a lot of weird stresses put on them. On the factory’s advice, we ended up deciding to make them out of glass-filled nylon rather than ABS+PC. Glass-filled nylon should be more resilient.
As it turns out, the factory has had a hard time getting the nylon versions of the bars to lie flat. When they’ve come out of the molds, they’ve ended up a little bit warped. This is… less than ideal for a part whose role in the world is to be flat and keep another part flat and aligned. The factory’s been able to make nice, flat versions out of ABS and ABS+Polycarbonate for months. With the glass-filled nylon version, they’ve been stuck tweaking the injection molding machine’s pressure, cycle time, and other parameters.
They even went so far as to build a straightening jig to fix the parts as they come out of the mold. It works similar to a how a set of braces helps a poor tween’s teeth end up nice and straight. This seemed like a bit of a cop-out to us, so we asked around and found out that this is a relatively common strategy for parts like this that have warping problems.
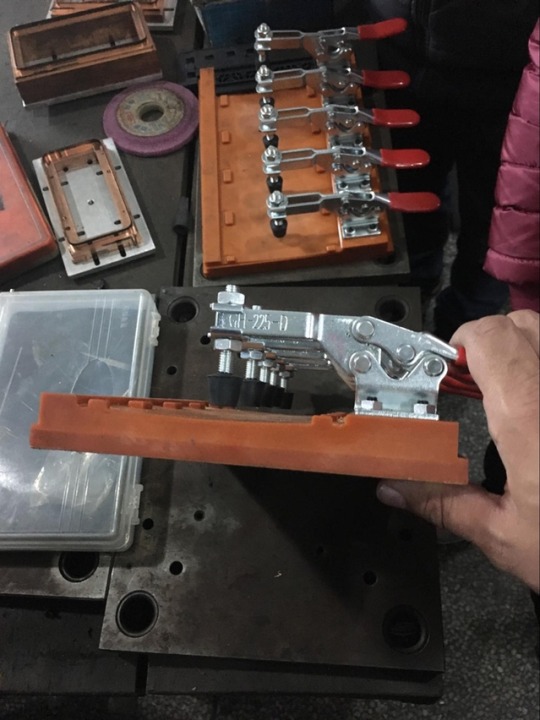
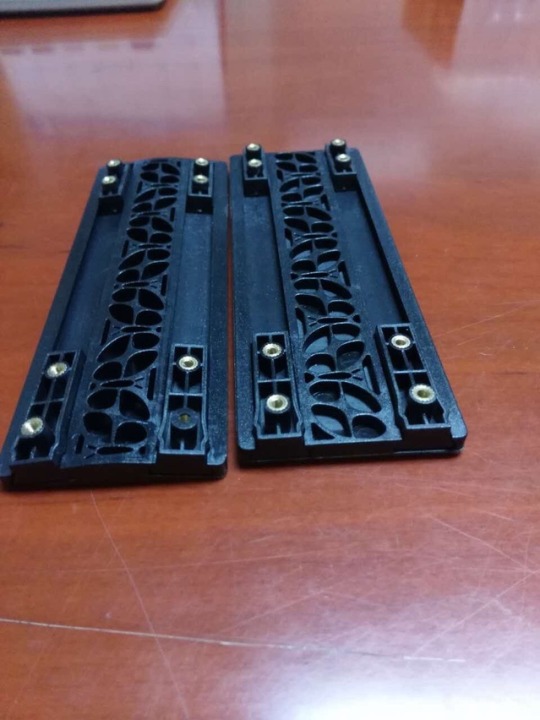
These are the straightening / flattening jigs
In the past couple days, the factory finally sent over pictures of glass-filled nylon center bars that look to be perfectly flat. They say that the solution ended up being a change to the percentage of glass in the nylon.
Previous versions of the rails that screw onto the bottoms of the enclosures have been a little bit loose, resulting in unnecessary wobbling. They’ve gotten a tiny revision to make sure that they fit snugly into the center bars.
We’re excited to test new samples of both parts when the factory sends them to us in the next week.
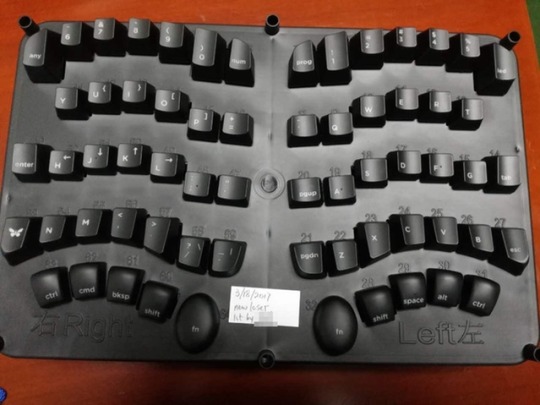
Keycap laser engraving
One of the most frustrating aspects of the preparation for mass production has been an ongoing series of quality issues with the painting and laser-engraving of the keycaps.
The first paint and laser supplier the factory was working with promised turnaround times of two to three days.
The first keycap samples they sent back had the key labels centered on the keycaps, when we’d specified that they should be anchored to the lower left hand corner.
The second samples that came back had the per-key alignment pretty much correct, but had put the left hand key labels on the right hand and vice-versa. Some labels ended up misspelled, which must have taken serious work, since we’d sent “camera-ready” copy.
The third samples just had… sloppy alignment. It looked like they’d gone in and modified our key layout to change the spacing between the symbols on a few keys and a number of keys had their labels engraved at a funny angle. A few keys had been engraved…upside down. We noticed that the sides of some of the keycaps didn’t have great paint coverage.
This was the point at which we decided to stop trying to get the labels right until Jesse was on the ground in Shenzhen.
Early in the trip, he visited the keycap laser engraving factory in Dongguan, the next city over from Shenzhen. Their operation seemed pretty professional and they appeared to know what they were doing. Our questions about how things had gone so badly wrong got kind of weird answers, but the supplier asked that we give them a chance. They promised to carefully check every sample before they sent it back.
While there, we took the time to ask them about the UV clearcoating they spray onto the keys to protect them after laser engraving. We asked if we could pay extra for higher-quality UV clearcoat “paint”. The factory boss said that we weren’t going to see any real quality increase from changing it out. We asked about whether they could do multiple coats to protect your keycaps better. The boss said that they already do two coats. When we asked “how about three?”, he told us that we’d be wasting our money and that two was really totally sufficient. We left with the understanding that they’d paint and engrave new samples and get them back to us in a few days.
It wasn’t until a day later that we found out that this was a new laser engraving supplier and that the factory was ditching the first supplier.
Well, the promised keycaps didn’t show up after two days. Or three. Or four. Or five. And then they finally showed up with exactly the same problems we’d seen before Jesse met with them.
After a very tense meeting, we finally figured out that somebody in the factory’s logistics department had sent the keycaps out to the old supplier again.
Early this week, the factory finally sent us photographs of newly-engraved keycaps from the new supplier. They look much, much better. We see a few small issues, though we can’t properly check them until the factory sends them to us.
One ongoing issue has been the quality of the painting toward the bottoms of the keycaps. This is because the “painting jig” for the keys places them too close together. When we asked why the painting jig packs the keys in so tight, we were told that it was designed to match the injection mold for the keycaps. And indeed it does. As best as we can tell, the keycap factory economized on steel when designing our mold, which has led to cascading problems down the line.
There’s a second issue with the painting jigs. Because they’re built without tall side-walls and ribbing, they have a tendency to, you guessed it, warp. This means that it’s much harder for key labels to end up aligned correctly. This issue, at least, is easy to fix. The jig maker is currently modifying the jig design.
Our factory tells us that the painting and laser engraving supplier has committed to taking responsibility for high-quality painting and engraving of all keycaps. As we understand it, the current process has the painting and laser engraving supplier’s staff manually moving keycaps between jigs to make sure there’s plenty of space for the paint to coat the keycaps. On top of this, the factory has committed that their QC team will reject any keyset with an error.
This is, somewhat understandably, stressing us out a bit.
RJ45 cables
The two halves of the Model 01 are connected by an 8P8C RJ45 cable, known to most of the world as an “ethernet cable.”
We’ve gone back and forth a number of times with the factory in our quest to get decent cables. The first few suppliers they reached out to had a hard time actually coughing up any sample cables at all, which isn’t exactly a great sign for a cable company.
One of the first samples we got back had such long cables that it couldn’t actually fit inside the Model 01.
Eventually, the factory found a cable supplier that seemed both willing and able to make us the cables we wanted.
We’d asked for samples of three different weights of cable: 24AWG, 26AWG and 28AWG. The goal was to find a cable that was heavy enough to get the power from one half of the keyboard to the other, but not so heavy (and stiff) that it was unwieldy. We ended up settling on the 26AWG cable weight for the 1M long cable.
The problem we’re dealing with now is the short (10-15cm) cable. When we use 26 AWG cabling, it’s stiff enough to put lateral stress on the RJ45 jacks on your keyboard when the two halves are connected by the center bar. If we ship with this cable, it will shorten the life of your keyboard. We’ve asked the factory to work with the cable supplier to find a more reasonable option. We showed them a “flat” cable as one possible solution, but the cable vendor nixed it, saying that they’ve seen far too many quality issues with those flat cables. We’re hoping to hear back about the factory’s meeting with the cable vendor in the next day or two. This isn’t a major issue and should be pretty easy to resolve, but we have to actually, you know, resolve it.
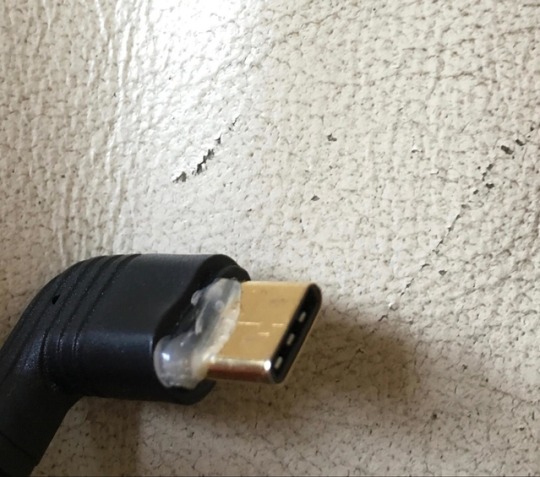
USB Type C cables
We’ve previously talked about the Type C cable we thought we were going to use. Its construction was good. It met the part of the USB spec so many cables cheat on. (It had a 56k resistor to identify itself.)
There’s just one problem with it that we didn’t catch. Its Type C connector is big and blocky and… slightly out of spec physically, meaning that it doesn’t mate cleanly with the Model 01 when the circuit board is inside the enclosure.
The factory is talking to the supplier, as well as other possible vendors. The long and short of it is that we may end up deciding to ship with “straight” USB A to Type C cables, rather than cables with a right-angle Type C connector. At the end of the day, a good cable with a solid connection is more important than the cable shape.
In a previous update, we mentioned we’d rejected a good-looking Type C cable because its internal resistor violated the USB specifications. One of us accidentally started to use the sample to charge a phone. The cable did a good job of reminding us that it was out of spec. It got so hot that the glue inside melted and leaked out!
Long lead-time electrical components
We’ve previously mentioned that the APA 102C LEDs we’re using are in short supply. We have enough on hand for the first 900 or so keyboards, but are still waiting on delivery of the rest of the order. The factory has a call in to the manufacturer to get a firm delivery date, but as of now, we have no reason to suspect that the LEDs are going to cause a delay in mass production.
The factory has about 500 keyboards worth of keyswitches on hand, with the balance to start showing up over the next month. This is later than we’d expected, but shouldn’t have a measurable impact on production. The factory had told us that their purchasing department was on top of switch procurement. When we asked them to confirm, they said that they had all of our switches sitting in their warehouse. When we asked them to confirm again, they realized that they’d made a mistake and only had 10% of the switches they thought they did.
The RJ45 jacks we’re using are another item with a bit of a longer lead time. These, at least, got ordered before Chinese New Year. The factory has enough of them on hand for the first 1800 keyboards and say that they’re expecting the balance of the order any day now.
As of now, the factory believes that none of the other electrical components they don’t have on hand have a lead time longer than a couple weeks.
Wooden parts
While in Shenzhen, we paid a visit to our wood supplier to check in on timelines for PVT, as well as a few special projects.
When we asked about the lead times for the enclosures for the first 100 units, we got a pleasant surprise. “Oh. Those are done. We have them in the warehouse. Do you want to see?”
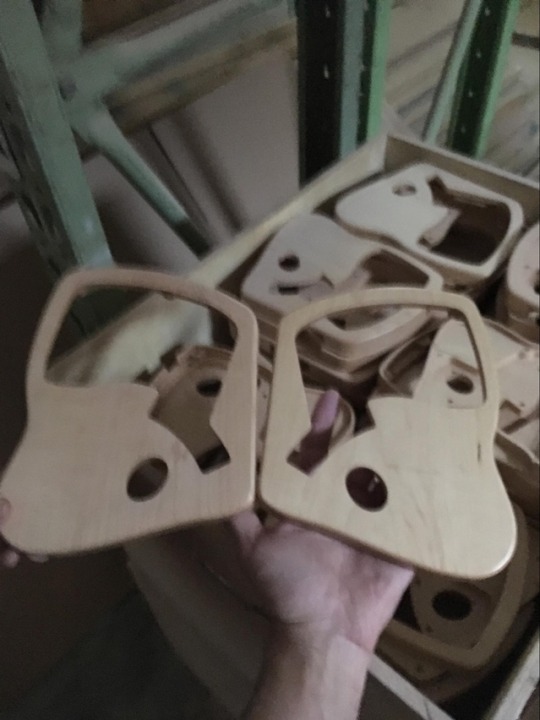
This was tied to another surprise. They’d gone ahead and made 100 sets of the stands out of wood. We hadn’t asked them do and hadn’t signed off on them, but they did it as a favor to the factory to help cut down timelines. They weren’t actually thrilled about making the parts, since the “organic” contoured shapes are very slow to CNC.
There are a couple issues we’re working through with the stands they made. The big one is that in some cases, their post-CNC sanding was a little bit aggressive, so some of the stands have a few edges that are a little flatter. We’ve asked them to go through the sets they’ve made and cull out the worst of the lot.
Our original plan had been to ship wooden stands with the PVT units because the plastic stands weren’t going to be ready. Given the other schedule slippage, that’s no longer an issue.
On the one hand, these are parts we didn’t order. On the other, we really like the wood factory and they’ve done a lot of spec work for us over the past two years.
The current plan is to offer them as a special-order after-market accessory. More on this front as it develops.
After that, we talked a bit about the lead times for mass production. It sounds like the first 2000 keyboards worth of enclosures will take 3 weeks from when we say “go.” The current plan is to say “go” once PVT units start arriving in folks hands and they verify that everything looks right.
Costs
One thing we haven’t talked a whole lot about over the course of this project has been money. There are a bunch of reasons for that. Many of them center on us feeling uncomfortable talking about money in public.
We’ve been pretty frugal throughout this whole process. While we’ve had outside help, we haven’t hired full time staff to work with us. Instead, we’ve brought in contractors for shorter gigs as we’ve needed their skills. We pay ourselves, but at nowhere near market rates. There have been times when we could have used more of your money to speed the project up, but we judged that doing so was more likely to hurt us down the road.
The upshot of this is that we’ve been in a very healthy cash position leading up to mass production.
One of the reasons we’ve been so conservative about cash is that it’s been our plan to use most of the Kickstarter and preorder profit to invest in inventory via a larger initial order with our factory.
That’s a very, very normal plan for a crowdfunding campaign. Heck, it’s a big part of the “kickstart” in Kickstarter.
We’ve been finalizing everything with the factory, now that the keyboard’s design is final, tooling is nearing completion, packaging has been designed, and accessories have been selected.
Even before Jesse went to Shenzhen, we’d been hearing stories from reputable sources about costs and lead-times for raw materials in China going up.
Even when you know it’s coming, a big increase in costs is never a welcome turn of events. The updated pricing we got from the factory just before Jesse left China was a good deal higher than the update we’d gotten before Chinese New year, spiking more than 20% due to materials costs. Some of the biggest jumps came in the costs of bare PCBs and the packaging itself. In the case of the packaging, it’s not just that materials costs have gone up. We’ve ended up with something nicer and more protective than originally planned.
But really, everything from aluminum to ABS pellets to cardboard has gotten a bunch more expensive. The only thing that (thankfully) hasn’t spiked is the price of the Canadian maple the enclosures are being milled from.
The factory is working to negotiate some of these increases with their suppliers and says they’ll have an updated proposal for us this weekend.
On the one hand, this was a pretty big shock and we’re pretty unhappy about it. On the other, the reason for most of the increases is something we support. China’s been in the process of tightening environmental regulations and significantly increasing enforcement of those regulations.
Cardboard boxes are a lot more expensive than they had been because, we’re told, the Chinese government has shut down a number of paper mills that were polluting the environment more than they should have.
So, where does this leave us?
We’re still figuring that out.
We’re not screwed.
This does not impact our ability to ship your keyboards.
It may or may not impact the number of keyboards we order for sale (rather than presale) to customers, as well as our ability to sell the Model 01 through channels (like brick and mortar boutiques or other websites) because there’s less margin to go around.
While we’re a bit stressed out about this, you don’t need to be. We’re being very careful to make sure that we still have enough cash on hand after ordering your keyboards to pay for shipping and to pay our taxes.
Right now, we need to sit tight and wait for the factory to finish negotiating with their suppliers. We know that the negotiated costs will go down a bit from the last quote. Once that’s done, we have folks who have been doing this for many years helping us out with vetting and negotiating the quotation. They’ve already been doing spot checks of a couple items and are digging into a few issues for us.
Firmware
There’s this particular feeling for an open source project author. It’s somewhere between pride, awe and abject terror.
We’re new parents, so we’re not entirely sure, but we suspect that it’s the same feeling you get when your kid moves out of the house.
In November 2013, Jesse created a trivial keyboard firmware for our prototype keyboards. He wrote it in an evening. While watching a movie. After having had a drink or two. (Jesse insists that while he was intoxicated when writing the first version of our firmware, he “never does this”)
Over the course of our time at Highway 1 and through the progression of prototypes we’ve built, he tweaked the firmware, always planning to throw it away before keyboards ever got into customer hands.
Last October, this guy showed up on #keyboardio, our IRC channel, to chat about the Model 01’s firmware. He quickly started to submit small patches to fix obvious bugs. And then we started talking about “advanced” features.
Before we knew it, Algernon (Gergely Nagy) had built some libraries for the Model 01’s Firmware. (At that point, we might have been calling it “Arduino-Keyboard” or “Model01-Firmware”). But he quickly found that the stuff he wanted to do wasn’t easy to do in the firmware structure we’d built.
He created his own firmware for the Model 01 called Akela. It had all sorts of neat features we really wanted in our firmware.
It should be noted that at this point, he didn’t have a Model 01 prototype, but it was clear to us that if anyone in the world should have one, it was him. It took a little bit of work, but we got FedEx to deliver a keyboard to him in Budapest on December 23. You can read about it on his blog: https://asylum.madhouse-project.org/blog/2016/12/24/the-package/
That’s when things really started to take off.
We somehow suckered Algernon into porting all of his cool code back into the Keyboardio firmware, developing a plugin infrastructure, and then splitting out just about all the functionality into plugins.
Before we knew it, our firmware had a couple of dozen plugins spread across the “Keyboardio” and “Akela” namespaces.
Algernon mentioned that there was another keyboard maker he’d been talking to who thought they might be interested in running our firmware on their board. He asked if we’d have a problem with that.
We don’t have a problem with that. It’s pretty much the validation of everything we’d hoped for with the firmware. The more keyboards running our firmware, the more users we have. That directly drives more people to be interested in hacking on the firmware, resulting in better firmware for everybody.
This did make one thing abundantly clear. Calling the firmware “Keyboardio Firmware” was no longer right. We wanted a name that references Keyboardio and/or the Model 01, but was broader and more inclusive.
We ended up settling on Kaleidoscope. A kaleidoscope make an infinite number of beautiful and unique works of art from a bunch of shiny baubles. Plugins are like shiny baubles, especially when they control neat LED effects.
As it happens, “kaleidoscope” is also one of the collective nouns for butterflies.
After we settled on the name, Algernon went and renamed all of our code and all of his code into the shared namespace.
To date, we have more than 40 firmware plugins for Kaleidoscope. You can read an overview of many of the plugins in Algernon’s blog post: https://asylum.madhouse-project.org/blog/2017/03/10/rose-tinted-glasses/
Over the past couple weeks, he’s been churning out new functionality so fast we can barely keep up.
First was AlphaSquare, which uses the Model 01’s LEDs to draw ASCII characters on your keyboard in a 4x4 pixel font.
Then came Focus, our long-promised bidirectional serial communication protocol. Plugins can register themselves with Focus to either send data back to your computer or let themselves be configured or updated remotely.
Over the past couple weeks, Algernon has been working on moving keyboard layouts and LED effects out of static program memory into EEPROM. What that means is that you’re now able to use Focus to change onboard key layouts without needing to change the Model 01’s program. Based on an offhand comment from Jesse on IRC, Algernon extended this support to let you remap a keyboard’s layout from the keyboard, using a scheme similar to the way older Kinesis Advantage keyboards did it.
One of the cool things he’s put together that he hasn’t announced anywhere yet (but said we could talk about here) is the first version of a tool that changes the Model 01’s keymaps based on your current application. His first implementation is for Linux, but the concept is very similar to a prototype we built for macOS a while back, so we’re pretty confident that ports for more platforms should be pretty straightforward.
Next up, it sounds like he might be working on a “fingerpainting” mode for LED lighting effects or letting you “record” macros on the keyboard.
Chrysalis
Of course, not everybody wants to hack their keyboard from their keyboard or to use a serial console to change their layout.
We’ve long promised a GUI tool for configuring your keyboard. As recently as a month ago, we were 100% sure that this was going to be something we built…a bit later, after we’d had some time to recuperate from shipping your keyboards.
Well, Algernon and @thebaronhimself (Simon-Claudius Wystrach) got to chatting about things on IRC and somehow Simon-Claudius ended up volunteering to start building the desktop GUI.
So far, our only contributions have been suggesting the name and some encouragement.
It’s very much early days, but Simon-Claudius sent over this animation of the core of the SVG+Javascript code that will let you use your mouse to configure your keyboard. We’re very, very excited.

A work-in-progress view of Chrysalis
What’s next
Right now, we’re working on getting the manufacturing and shipping logistics set up while we wait for the latest sample parts from the factory and the factory waits for the keycap tooling supplier to finish fixing the issues we talked about in the last update. As we wrote last time, the ETA for all of that to be wrapped up is early April.
If all goes according to plan, the next backer update should find Jesse back on the ground in Shenzhen doing quality control checks on the first 100 Model 01s to roll off the line. If that’s not the case, we’ll be back next month with more exciting stories from the trenches.
<3 j+k