(This post originally appeared on Jesse’s blog in April of 2013.)
It’s been quite a while since I’ve written about my keyboard hacking project.
Since I wrote up the Mark 1 keyboard, I’ve made 5 more keyboards. I’ve learned a bunch about soldering, I’ve learned how to operate a laser cutter and I’ve learned a bit about 3D printing. I’ve also learned a bit about ergonomics and keyboard design.
I’m going to take this chronologically, even though that means I’m going to tell you about stuff that I later discovered was…not so right. So, bear with me through some clunky keyboard prototypes. It gets better. This post documents work from January, 2013.
To recap, the Mark 1 keyboard was based on the shell from the ErgoDox. It was a two-hand split layout, which turns out not to work well when you type with your keyboard in your lap. I had the ErgoDox 3D printed by ShapeWays. It was very expensive. Expensive enough that buying a 3D printer didn’t sound like a bad idea. It actually sounded like a vaguely plausible idea. The 3D printer I ordered, an Aluminatus from Trinity Labs was going to take a while to ship, so I started looking around for other options. (They have since started shipping. The production units are more expensive than the beta version I got.)
It turns out that Cambridge, MA is home to danger!awesome, a storefront lasercutter shop. Yeah. It’s as awesome as it sounds. It isn’t particularly dangerous, though. I’m not complaining.
To get a lasercutter to do its thing. you need to feed it a vector file describing the cuts you want it to make.
To design the Mark 2 keyboard, I used my favorite vector drawing package – Omingraffle. I drew a bunch of 14mm holes in a pattern that seemed to make sense and sent Danger Awesome an eps file.
Two days later, I dropped by their shop and picked up an 11"x17" sheet of green acrylic with a bunch of 14mm square holes cut out of it. The nice folks at danger!awesome weren’t quite sure what I was up to, so they saved all the little 14mm square munchkins they’d cut out of the plate.
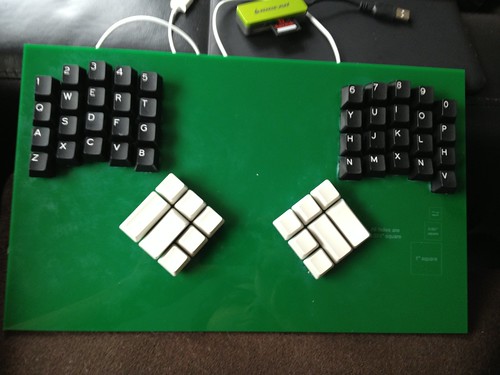
I brought the sheet home and started sticking Cherry keyswitches into the holes. I quickly discovered that my acrylic sheet was too thick for the keyswitches to stay in place when I pushed them into the holes. It turns out that Cherry keyswitches have cute little clips designed to fit into 1.5mm thick plates. I quickly hit upon a solution that eventually turned out to have been a really bad idea. I…painted superglue around the edge of each key. This had the intended effect of making the keyswitches stay put. It also had the unintended effect of making the keyswitches somewhat…scratchy feeling.
I soldered up the Mark 2 very similarly to how I did the Mark 1. It…took a lot less time, though. Probably only 10-12 hours. (Since then, I’ve gotten much faster and more accurate. And have better ways of wiring everything up.)
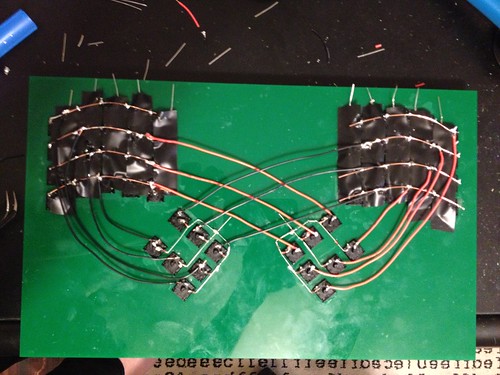
Rather than use the prototyping wires I used to connect the Teensy in the Mark 1 to the keyboard, I decided to try a ribbon cable. I happened to have a bunch of old IDE cables hanging around, so I chopped one end off a cable and started soldering. All in all, it worked pretty well.

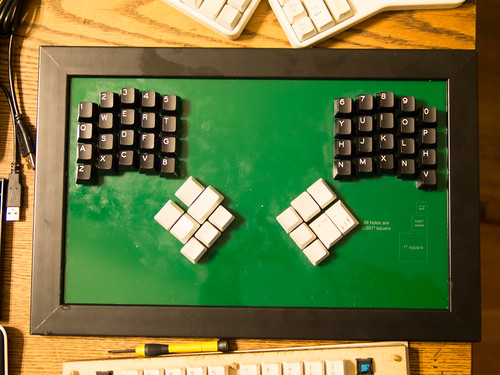
I then had a working keyboard….at least as long as I carefully held it in the air so nothing crushed the key wiring. I needed a case. The right thing to do was probably to have more parts lasercut, but I was impatient.
I hopped on my bike and pedaled down to the neighborhood Michael’s to look for something I could use for a case. After a bit of wandering around, I found something that worked reasonably well…A picture frame designed for 11"x17" photographs. That got me enough height to make sure my keys and wiring weren’t crushed. I let them keep the glass from the frame & had them cut a matte to the outside dimensions of the frame rather than the inside dimensions. Yeah, my keyboard had a paper back. Not great for a production keyboard, but just fine for a prototype.
Within a couple days, it became clear that the keyboard was..not perfect.
I’d designed the hand layouts with a nice finger staggering. but each laid out..straight in front of me. It was a little bit like a flat Kinesis or Maltron. It was typeable, but not amazing.
The key column layout wasn’t right.
The keyboard was big.
The picture frame shell was…heavy.
It was a reasonble prototype, but I could do better.
Next up would be the Mark 3. It wasn’t right, either.